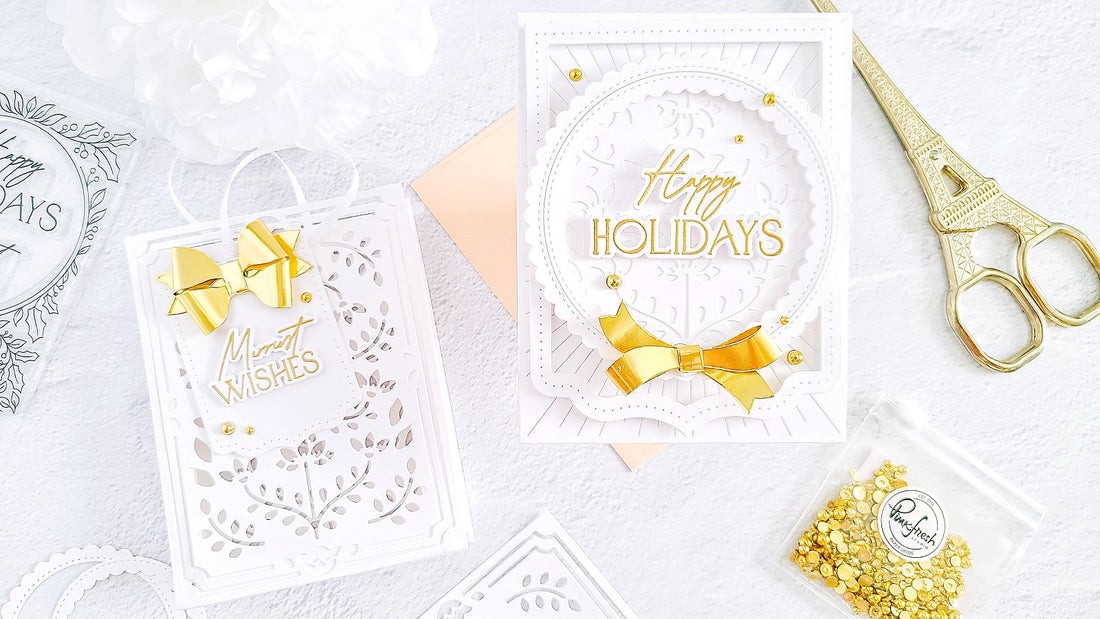
Holiday Card + Mini Matching Gift Bag┃Yasmin Diaz
Happy Monday, Pinkfresh friends! Yasmin here sharing with you an elegant & delicate, yet extra detailed “Holiday” inspiration card + a mini matching gift bag. Thus, to make this delicate set I used; Essentials Stitched Scallop Circle Die Set, Essentials: Radiating Background 2 Die, Happy Holidays Circle Frame Stamp, Happy Holidays Circle Frame Die, Essentials: Braided Circles Die Set, Folk Dance Die, Ornate Banner Die Set and Artistic Bows Die Set. So, without further ado let’s jump right into the step-by-step for how I made them.

Therefore, I started off by creating the card so to do that, I’d like to mention that this set involves lot of die cutting however, to keep it simple I decided to go for a white-on-white look, because you cannot go wrong with a white and gold combination, am I right!?? Having that said, I went ahead to line up the Essentials: Radiating Background 2 Die over an A2 size white card panel and then, I proceeded to run them through my die cut machine.

Next, as soon as I’ve got finished adding the radiant detail with the die to the card panel, I went ahead to get the backing of it adhered with double-sided adhesive to an A2 size top folding white card base. Then, right after that I’ve got the panel adhered to the card base, I went ahead to put it off to the side to continue with the die-cutting for the card layering.

Thus, to create the white die-cutting ornate frame, I used white cardstock along with the two largest dies including in Ornate Banner Die Set. Then, for the scalloped white die-cutting circle, I used once again white cardstock along with the larger die including in Essentials Stitched Scallop Circle Die Set. So, once I’ve got finished die-cutting the ornate frame and the scalloped circle, I’ve gone ahead to mount the frame over the front card panel using narrow pieces of craft foam adhesive and then, I put the die-cutting scalloped frame to the side.

Meanwhile, I went ahead to line up the Folk Dance Die over an A2 size white cardstock panel and then, I went ahead to run them through the die cut machine. I repeated this step three times once to use it for the card and the other two die-cutting panels to use them for the mini gift bag which you’ll see right below. Having that said, right after that I’ve got finished die-cutting the three panels, I went ahead to put two off to the side and then, I proceed to line up the circle die including in Essentials: Braided Circles Die Set over the other die-cutting panel to get a perfect die cut circle out of it. Then, as soon as I’ve got finished die-cutting the detailed circle, I went ahead to get a second die-cutting circle but this time out of plain white cardstock.

Moving on, as soon as I’ve gotten the die-cutting pieces completed, I went ahead to put them together, so to do that, I went ahead to layer the detailed die-cutting circle over to the plain die-cutting circle. Next, I proceeded to mount the layered die-cutting circle with square foam adhesives over the card. Then, I went ahead to get the scalloped die-cutting circle mounted with square foam adhesives over the detailed die-cutting circle to add more dimension to it. Lastly, I’ve got mounted the card sentiment, a sentiment which by the way, I’ve had gotten previously created using white cardstock along with one of the sentiments and one of the coordinating dies including in Happy Holidays Circle Frame Stamp and Happy Holidays Circle Frame Die. Last but certainly not least, I went ahead to create a gold die-cutting bow using gold cardstock and the dies including in Artistic Bows Die Set. Nevertheless, I went ahead to get the die-cutting bow glue down to the card (as shown in the image above) and then to finish the card off, I’ve gone ahead to glue down here and there some of the Metallic Pearls -Gold to add the card an extra touch of shine.

I created this mini gift bag with the thought to use it to gift a gift card, chocolates or why not to fill it up with die-cutting pieces and extra sentiments. to gift it to a crafty friend. Therefore, to make this mini gift bag I used the die cut panels that I created earlier at the beginning of this blog post.

Thus, the first thing I did was to decide the width for it, so I went ahead to trim down two pieces of white cardstock to H 5-1/4” x W 2.0” inches + one white cardstock piece to H 4.0” x W 2.0” inches. Therefore, right after that I’ve got finished trimming them down, I went ahead to place them down over my scoring board to mark three scoring lines at 1/2”, 1.0” and 1-1/2” inches point marks. And, once I’ve had that step completed, I’ve gone ahead to fold them over creating two mountains and one valley.

So, as soon as I’ve had finished folding them over, I went ahead to get the sides and bottom of the gift bag adhered to the die-cutting panels using narrow double-sided adhesive but making sure that both die-cutting panel were perfectly aligned with the pretty sides outward for the back and front of the bag. Also, making sure that the mountain folds were facing inwards of the bag (as shown in the image above) for reference.

To add an extra detail to the mini gift bag, I went ahead to add some handles so to do that, I went ahead to open 2 holes for the upper back and front of the bag using a hole puncher. Then, I added pieces of narrow ribbon, pieces which I tied up inside the bag as shown in the image above for reference.

Finally, to finish the mini matching gift bag off, I went ahead to get it embellished with a die-cutting tag, a die-cutting bow and a die-cutting sentiment, which by the way, I’ve had gotten previously created using the same dies and stamp sets that I used to make the card. And, with that being said, thank you for stopping by we hope you have enjoyed reading the step-by-step for how I’ve made this elegant & delicate, yet extra detailed “Holiday” inspiration card + a mini matching gift bag using an array of beautiful products by Pinkfresh Studio.
If you get inspired by today’s projects don’t forget to tag us @pinkfreshstudio and use #pinkfreshstudio so we can see your projects! Happy crafting and much love to you and yours.
Crafty Hugs,
- Yasmin
1 comment
So very beautiful in all this Winter White!
=]