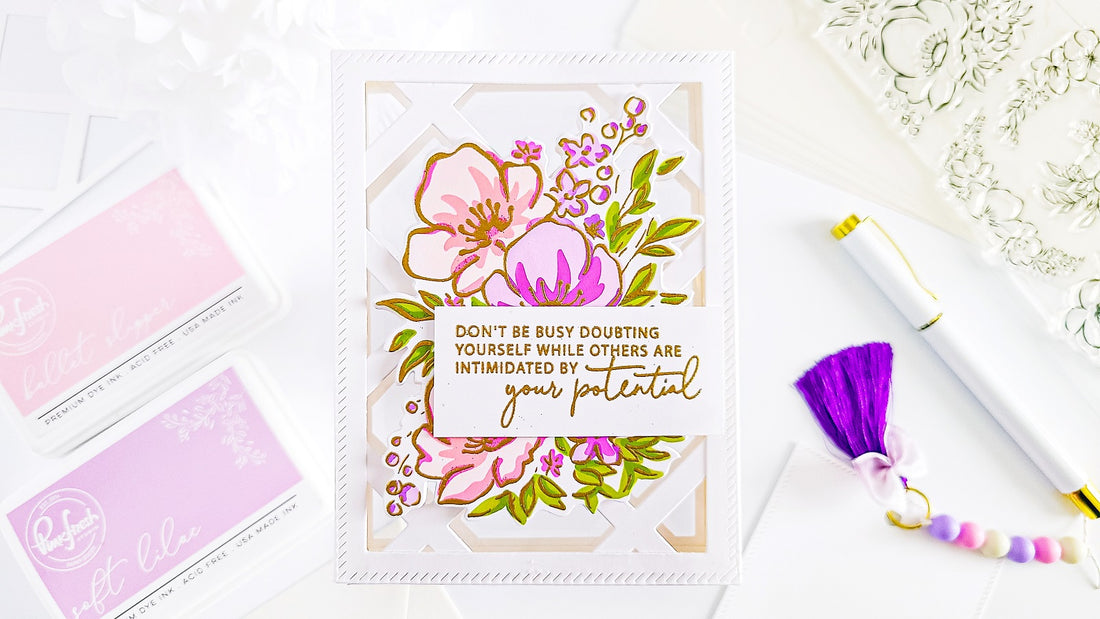
Anemone Magic Dimensional Shadow Box/Card┃Yasmin Diaz
Happy Monday, Pinkfresh friends! Yasmin here sharing with you a see-through and very dimensional floral, yet still elegant & delicate “Shadow Box” inspiration card. Thus, to make this dimensional interactive card I used; Anemone Magic Layering Stencil Set, Anemone Magic Stamp Set and Anemone Magic Die to create the card floral focal point. Simply Diamonds Die to create the front and back die-cutting panels + Essentials: Diagonal Stitched Rectangles Die Set to create the back and front diagonal stitched frames. Along with those sets, I’ve had also used; PFS- Inks to ink up the floral cluster. So, without further ado let’s jump right into the step-by-step for how I made it.

Therefore, I started off by creating the shadow box card base, so to do that, I went ahead to line up over a large piece of white cardstock the Simply Diamonds Die and then, I went ahead to run them through my die cut machine. Next, I repeated the same steps to get a second die-cutting panel using the same die. Then, I put them off to the side while, I went ahead to line up over a large piece of white cardstock the two diagonal stitched dies including in Essentials: Diagonal Stitched Rectangles Die Set and then, I ran them through my die cut machine to get die cut out the stitched frame from it. Same as the previous steps, I went ahead to get a second stitched die-cutting frame and once, I had all four die-cutting pieces I went ahead to set them off aside.

Meanwhile, I went ahead to trim off three white cardstock pieces with the following measurements for the first two measure H 5-1/8” x W 1.0” inches and H 3-7/8” x W 1.0” for the smaller one. Once, I’ve got those three pieces trimmed off, I went ahead to place each of them to my scoring board tool, to get the scoring lines marked over them in every 1/4” of the inch from it. Next, as soon as I had finished making the scoring lines over them, I went ahead to fold them following the scoring lines in an accordion way or mountains and valleys if you prefer to call it that way.

Thus, to create the shadow box card base, I went ahead to adhere down with narrow adhesive the 2two stitched die-cutting frames over the other two die-cutting frames. Although, it does not show in the images, I would like to mention that the stitches die-cutting frames are smaller than the decorative frames, so I went ahead to trim off the excess from the edges using my paper trimmer, and once I had that step completed, I decided to add two large pieces of acetate to the backing of each of the front and back panel for the shadow box, creating that way the shiny glass looking feeling that those beautiful glass shadow boxes have.

Having that said, right after that I’ve got finished layering the front and back panels, I went ahead to add pieces of narrow double-sided adhesives to each side of the folded pieces, and once I had step done, I went ahead to get them adhered to the backing of the front and back card panel (as shown in the image above.) Then, same as I did for the sides, I did it as well for the bottom of the card base. I could have added a second small piece on the top of it for a full shadow box looking design, but I decided to leave it open to add insert a note which you will see below on this post.

Moving on, as soon as I’ve gotten the shadow box/card base completed, I went ahead to put it off aside, so I could get the layered inking for the floral cluster started. Thus, for the floral cluster, I used Anemone Magic Layering Stencil Set wit the following ink color combination; Ballet Slipper Ink, Sparkling Rose Ink, Bubble Gum Ink and a touch of Warm Buff Ink for the pink hues. Then; Soft Lilac Ink, Candy Violet Ink and Lavender Ink for the purple hues + Grassy Knoll Ink, Olive Ink and Warm Buff Ink for the green hues. I added those touches of Warm Buff Ink to mute a little bit the bright pinks and to warm up the greens. Having that said, after I’ve gotten finished the layered ink up, I went ahead to use Anemone Magic Stamp Set to get the stamping and gold heat embossing done over the inked up floral clusters, along with Anemone Magic Die which it happens to be it coordinating die to die-cut the floral clusters out of the large white cardstock piece. And, because I did not want the backing of the adhesive to see-though from the floral cluster, I went ahead to die-cut once again the floral clusters, but this time out of plain white cardstock.

At this point the floral clusters were fully completed, so I went ahead adhere down the larger floral cluster with square foam adhesives to the front of the card and then I put it off to the side, so I could get the card sentiment stamped over a large pieces of white cardstock. Thus, for the card sentiment, I used one of the sentiments including in the in the stamp set, and once I had that step completed, I proceeded to trim it down using my paper trimmer. Lastly, I adhered down with double-sided adhesive the card sentiment over the right lower side of the card. Finally, to finish the shadow box/dimensional card off, I went ahead to use the two-leftover die-cutting panels that I have left from the two larger stitched panels to use them as a note card. A note card which I’ve gotten embellished by punching a hole with hole puncher right in the middle of it, on which I added a charm made using pink, purple, and white beads + a small tassel.

Quick notes, this shadow box looking card stand up by itself and showcase beautifully on its own. Besides that, it fits a little tight, but perfectly on an A2 size envelope. However, due the dimension created by the embellishments added to the insert note card I made this will not fits on an A2 size envelope. Thus, if you want to re-create this extra dimensional card, there is something to keep in mind, but if you are delivering it by hand add as many embellishments of your preference, but if you want to make it by mailing it to a friend, you might want to skip any embellishments to the insert/note card.
TIP: While adhering down both card panels, make sure to get them line up perfectly, so the back and front design coordinates for a perfect see-thorough look.

With that being said, thank you for stopping by we hope you have enjoyed reading the step-by-step for how I’ve made this see-through and very dimensional floral, yet still elegant & delicate “Shadow Box” inspiration card using an array of beautiful products by Pinkfresh Studio.
If you get inspired by today’s projects don’t forget to tag us @pinkfreshstudio and use #pinkfreshstudio so we can see your projects! Happy crafting and much love to you and yours.
Crafty Hugs,
- Yasmin