Lovely Pyramid Mini Album | Celes Gonzalo
Happy Monday! And hello everyone! I'm Celes and I'm sharing a new idea with "The Best Days" collection. I love to make mini albums and I'm always looking for new structures or planning new ideas. This time I want to share with you this lovely Pyramid Mini Album. The perfect gift for you someone you love, for a birthday and even for next Christamas! ;)

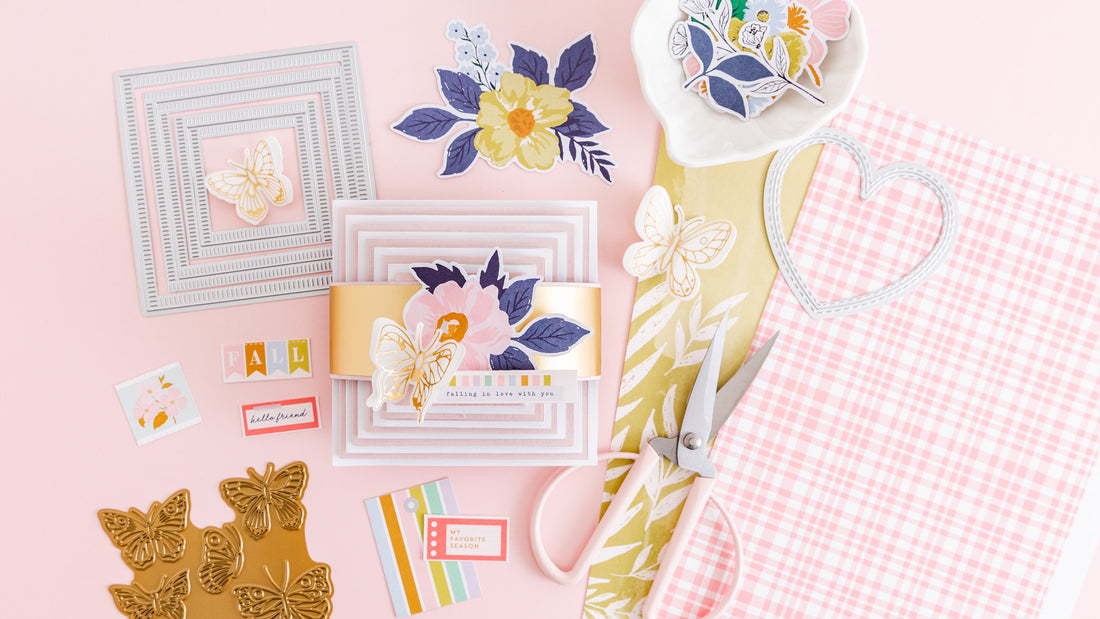
To make this mini album you can use both paper packs: 1- the 12x12 paper pack or/ and 2- the 6x6 paper pack. You will see that I have used the 6x6 pack much more and even I used the small embellishments it brings (love the size and colors).
I also used some of the new Essentials Release items from this month :) they are amazing! I used the Blanket Stitched Squares Die Set and the Shaker Hearts Die Set. And my new creative obsession... Hot Foil Plates! I'm in love with the Small Butterflies Hot Foil Plate and the Small Butterflies Die.

Let's get started! :)
For the closing mechanism: I used soft pink cardstock and gold mate paper. Just cut two strips of paper of 12"x 1 1/2" (you will cut 1/8" to the width of the gold paper) Glue them together and have adhesive velcro dots/mini magnets at hand. But don't use them until you finish your project.
Glue in the center of the paper strip a flower from the Floral Ephemera Pack , a butterflie (I prepared it with the Small Butterflies Hot Foil Plate) and a small phrase (from the 6x6 paper pack).

For the structure I prepare a design base in the Blanket Stitched Squares Die Set. You need 10 pieces of cardstock (5 in white cardsotck and 5 in soft pink cardstock) Pieces in white cardstock: 8 1/2" w x 4 1/4" h, 7 1/2" w x 3 3/4" h, 6 1/2" w x 3 1/4" h, 5 1/2" w x 2 3/4" h, 4 1/2" w x 2 1/4" h. Score them in half (width). Pieces in soft pink cardstock: 8" w x 4" h, 7" w x 3 1/2" h, 6" w x 3" h, 5" w x 2 1/2" h, 4" w x 2" h. Score them in half (width).
You will uses the Blanket Stitched Squares Die Set to decorate some of the pages of this pyramid mini album.
Tip: before gluing all the pieces together, prepare the interior structures.


For the pages: you can create different structures for all you pages. You will see that I even made a shaker using the Shaker Hearts Die Set and polaroid style frames/shadow box style frames using the Blanket Stitched Squares Die Set.


Time to have fun! :) You can play with structures as much as you want. You can make vellum pages using the dies and small pockets.


Another idea is to make foldout pages in differente sizes. Can be simple structures or with velcro / magnet closures.

 To decorate all the pages and structures I used the Ephemera Pack, the Cardstock Stickers, the Floral Ephemera Pack, butterflies that I made with the Small Butterflies Hot Foil Plate. I also love to include details with sewing thread ;)


In the biggest pages you can even add some of the pieces of the Journaling Bits (they are perfecto to add extra spaces for photos and memories).


Once you have all the pages ready... it's time to finalize the mini album ;). All you have to do is to glue each of the pieces from smallest to largest. Remember to give the adhesive enough time to dry.


Final detail! Now that our Pyramid Mini Album is ready we can see if be need to cut the strip for the closing mechanism and we can add the adhesive velcro or magnet to it. It's super easy to do ;)

I hope you like this idea! I would to see your version :)
Thanks for stopping by! Have a great week!