Happy Fall Diary | Celes Gonzalo
Hi everyone! It's Celes here again ;) So happy to share a new idea with you! And today we are going to create something sweet and very special for fall. Do you like to keep all your daily memories in a special way? I'm going to show you how to create a "Happy Fall Diary" using the wonderful "The Best Days" collection.

This is a very versatile idea. It's like a mini album but it has space for cards, a notebook and you can add extra pages in the future by making an insert booklet. Isn't it great? Let's get started!

For the structure you will need 3 pieces of cardboard of: 1- two pieces 5 1/2" w x 6 1/2" h, 2- one piece 1 1/2" w x 6 1/2" h. Choose two design papers from "The Best Days" Paper Pack (12x12 paper pack) to cover both covers and the spine of the structure. Glue them together to form the structure. Remember to add the ribbons for the mini album closure before pasting the interior paper (in this case I used the cover of the pad). Don't worry if there is space left uncovered, we will add paper pockets.

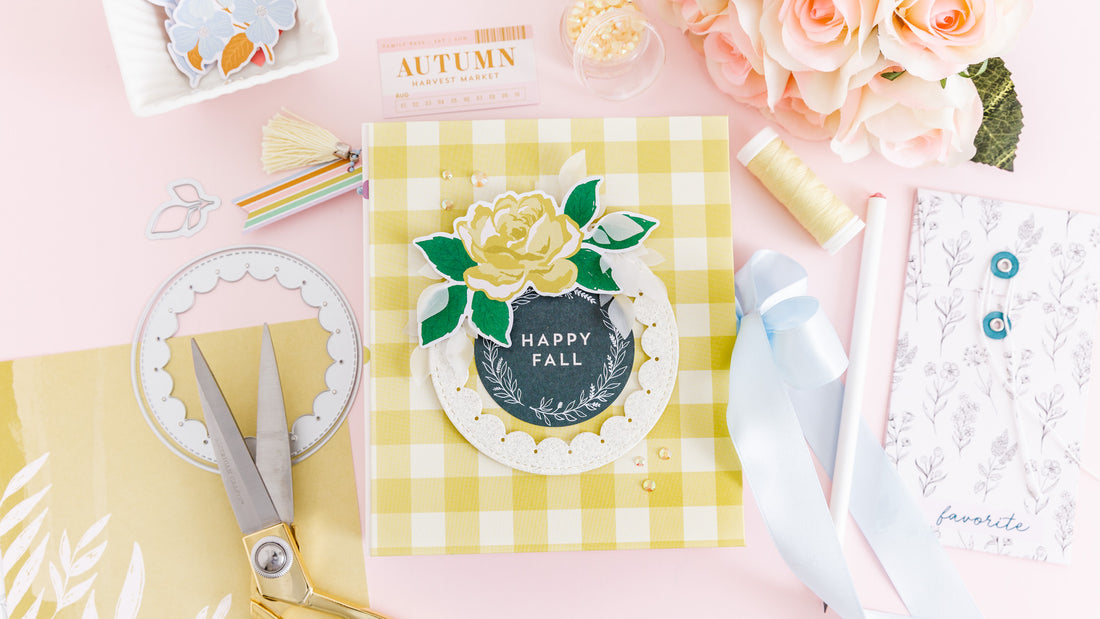
For the cover: I cut one piece of the bigger die (Essentials: Inverted Stitched Scallop Circles Set) using a Soft White Glitter paper. I glued the bigger piece on the cover using foam 3d. Then, I stuck the die cut from the Ephemera Pack in the center. As decorative accessories I used: 1- I cut a piece leaves of vellum usisng the Garden Wreath Set, 2- one die cut from the Floral Ephemera Pack , 3- colored jewels from the Jewel Mix.

For the spine: punch 1 hole or 1 pair of holes, 3/4" away from edge (top / bottom). I added some decorative details. In case you need extra pages in the future: you can punch another hole, pass an elastic cord and add an insert booklet.

For the notebook you will need 2 pieces of cardboard of 4 1/2" w x 6" h. Choose two design papers from "The Best Days" Paper Pack (12x12 paper pack) to cover both covers. To assemble the complete structure we will make a binding with wires (you can use another method, but keep in mind to adapt the measurements of the spine). I used a 0.625" binding wire.


For the interior pockets: the final measurements of them are 3" w x 6 1/2" h. Remember to leave 1/8 "thick in the envelope where we will place the notebook.

For the notebook cover: as decorative accessories I used 1- one frame from the Chipboard Frames , 2- one puffy sticker from the Puffy Stickers pack, 3- numbers from the Mini Alphabet Stickers pack. Also I added a piece of baker twine and one mini brad to pretend that everything is a painting ;) Loved the result!


For the interior of the notebook: you can add blank paper pages and other design paper, create some pockets and doble pages, etc. You can add any type of structure you like. Just take into account the maximum that our binding can withstand.


To decorate it I started using: some pockets from the Journaling Bits pack, die cuts and floral from the Ephemera and Floral Ephemera packs, Cardstock Stickers and more. Just enjoy the process and have fun ;) Now you are ready to document all your Happy Fall!
I hope you like this idea! Thanks for stopping by! See you!