Folk Garden 2 Pop Up Card┃Yasmin Diaz
Happy Monday, Pinkfresh friends! Yasmin here sharing with you this fun, yet extra glimmering “Pop-Up” inspiration card made using Folk Garden 2 Hot Foil, Folk Garden 2 Layering Stencils and Folk Garden 2 Dies to create the floral touch. Besides that, I’ve also used Brushed Sentiments Hot Foil and Brushed Sentiments Dies for the card sentiment. Essentials: Crystal Mix and Holiday Magic: 12 x 12 Paper Pack to embellish the card and of course PFS- Inks to ink up the flowers and leaves. So, without further ado let’s jump right into the step-by-step for how I made them.

Therefore, I started off by creating the hot foil stamping for the floral clusters, so to do that, I went ahead to line up the Folk Garden 2 Hot Foil plate over my foil glimmer foil platform along with a piece of glimmer foil and a large piece of white cardstock. Next, I ran them through my die-cutting machine to complete the hot foil stamping process. At the same time, I’ve got completed the hot foil stamping for the card sentiment as well, so I used one of the hot foil plates including in Brushed Sentiments Hot Foil and then, I repeated once again the previous steps to get the card sentiments hot foil stamped over another large piece of white cardstock.

Thus, to create the pop-up card base, I went ahead to trim down a piece of white cardstock to W 11-3/4” x H 5.0” inches. Next, I placed down the large piece of white cardstock over my score board to get some scoring lines traced over the long side of it using my Teflon bone folder at 4.0”, 5-1/2”, 9-1/2” and 11.0” inches marks. Then, I rotated the cardstock piece over the score board to mark another score line at 3.0 inches.

Moving on, after getting the scoring lines traced over it, I went ahead to fold over and burnish the folds using my Teflon bone folder for a crisp looking folds. Then, using my scissors I went ahead to fussy cut out the top part of the folds, so if you’re familiar with pop-up boxes you might know that they have the 3 front flaps hanging to cover up the elements inside of them. However, for this card, I decided to cut out the front and side flaps using my scissor because, I wanted to add a large card sentiment and didn’t want the flaps to interfere with it as I was going for a dimensional displaying card look and not for a full pop-up technique.

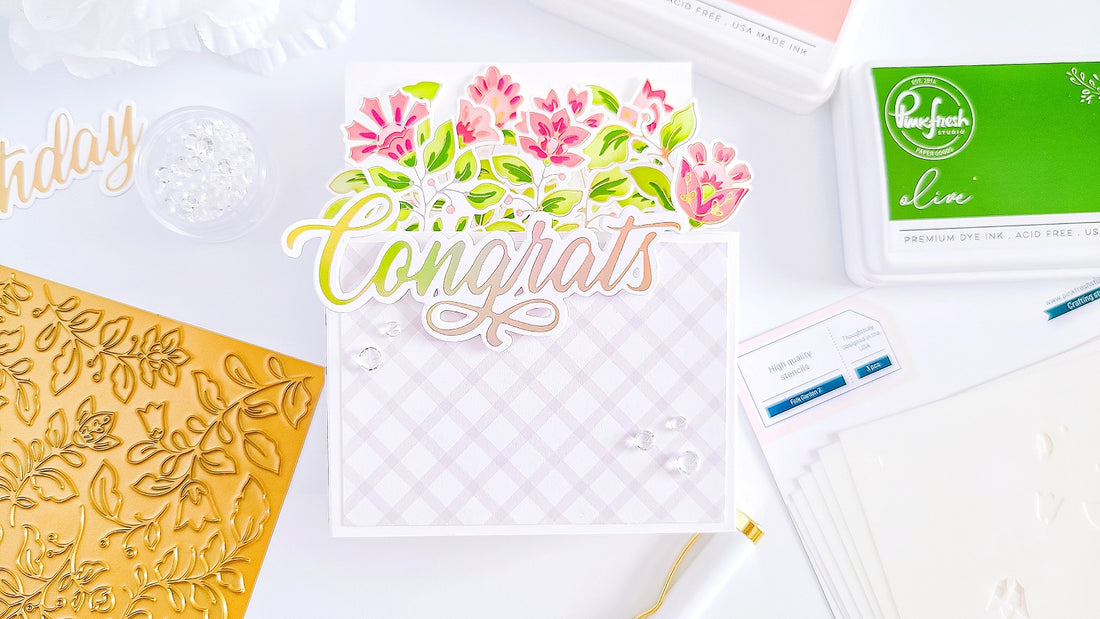
So, after getting the front and side flaps cut out, I went ahead to trim down 2 pieces of white cardstock to W 5.0” x H 1.0” inches. Next, I went ahead to get some scoring lines at 1/2” of an inch from each side of them. Thus, to close the pop-up card, I went ahead to adhere down the first smaller piece with double-sided adhesive edge to edge with the last scoring line then, I left the 1/2” inch space between the first and second piece to get it adhered in the same direction. Right after that I’ve got that step done, I went ahead to fold over the smaller flap over them and I added a piece of double-sided adhesive to get the back of the pop-up card adhered over it. Once, that I had that step completed I went ahead to adhere the other ends of the smaller pieces inside the pop-up card and once, I’ve got that step completed, I proceeded to glue down the die-cutting floral clusters and foliage (as shown in the image above.) Floral clusters, which I’ve had previously cut out using their coordinating dies.

I would like to mention that I used every single floral image create by this set for a fuller look, however there’s enough room to add more for a fullest look, but instead I decided to stop there for a cleaner look since I wanted that the card sentiment stand out by its own as well. So, after having the floral images into place, I went ahead to use the coordinating die including in Brushed Sentiments Dies set to die cut the card sentiment from the cardstock. Therefore, to finish the card off, I went ahead to trim off 3 smaller pieces of patterned paper using one sheet from Holiday Magic: 12 x 12 Paper Pack and then, I’ve got them adhered to the front and sides panels of the card. Then, to add an extra pop of shine, I’ve got glued down some clear crystal from my Essentials: Crystal Mix. And, last but certainly not least, I went ahead to mount the card sentiment on which I’ve had added more dimension by die-cutting the same word out of plain white cardstock. And, with that being said, here is a side look for how this card look all finished.
NOTE: This card will not fit on a standard A2 size envelope. Due the measurements it does fit on an A7 size envelope, however if you cut down 1/4” of an inch from the back panel it can also fit on an A6 size envelope. But you can definitely feel free to manipulate the measurements to create your own size by just keeping the main idea knowing how the mechanism works.

And, with that being said, here is a side look for how this card look all finished. So, thank you so much for stopping by we hope you have enjoyed reading the step-by-step for how I’ve made this fun, yet extra glimmering “Pop-Up” inspiration card using an array of beautiful products by Pinkfresh Studio.
If you get inspired by today’s projects don’t forget to tag us @pinkfreshstudio and use #pinkfreshstudio so we can see your projects! Happy crafting and much love to you and yours.
Crafty Hugs,
- Yasmin