
Happy New Year, friends! Dilay here and I am so excited and honored to share my very first post as a member of the Pinkfresh Studio Design Team!
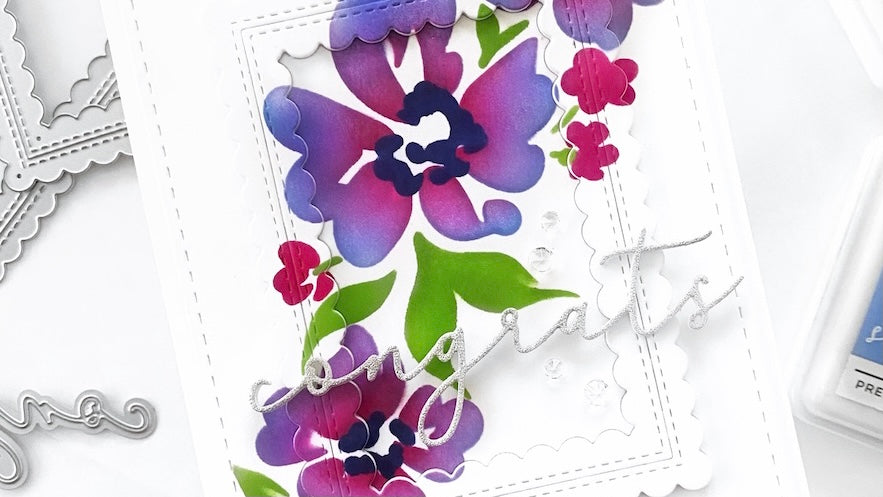
Today, I am sharing a traditional-sized card that I created using the lovely Floral Notes layering stencils. Let’s dive right in!

For this card, I used a technique that I’ve been wanting to try: creating my own patterned paper using slim layering stencils. It’s super easy and, as a bonus, is a great way to stretch your supplies!
To begin, I cut down a piece of white cardstock using the larger size of the Stitched Rectangles die set. I then stabilized the cardstock on a media mat while I stenciled the flowers using the Floral Notes coordinating stencil set. Since these stencils are intended to be used for a slimline card, once I centered and positioned the first stencil, I held it in place using low-tack tape before ink blending. Although there is a coordinating stamp for these stencils, I opted to not use it because I wanted a softer, no-line look. For the first stencil, I used Bubble Gum ink for the center of the blooms and blended it out using Slumber ink. For the second stencil, I used the same two colors (with a smaller blending brush) on the smaller flowers. Lastly, for the third and final stencil, I used Key Lime ink for all of the foliage.

Next, I die cut the center of the ink-blended Stitched Scallop Rectangle die set using only the smaller of the two frames, which ends up leaving an outer piece, a center frame, and an inner piece. I wanted to add dimension to the center frame, so I die cut the Stitched Scallop Rectangle die in white cardstock three times and adhered the layers together and under the ink-blended frame. I then adhered the entire configuration, with raised center, onto the center of an A2 size base.

For the sentiment, I die cut the ‘congrats’ sentiment from the Thin Words Everyday Script set three times in white and once in silver glitter cardstock. I adhered the layers together then adhered the sentiment onto the card. To finish, I added clear jewels to embellish my card!
Thank you so much for stopping by and I look forward to sharing more creations in the future!

8 comments
Nancy Rodeberg
This is so beautiful! I love your design and the stenciled flowers, choice of colors are perfect! Thanks so much for sharing your details!
Dee
Wow! This is so pretty! Having the tools to make something like this is one thing but being so talented and creative to come up with this is another! Great job! I’ll have to give it a whirl!! 🤭
Daniel Diaz
Sooo beautiful ❤️
Leave a comment
All comments are moderated before being published.
This site is protected by hCaptcha and the hCaptcha Privacy Policy and Terms of Service apply.