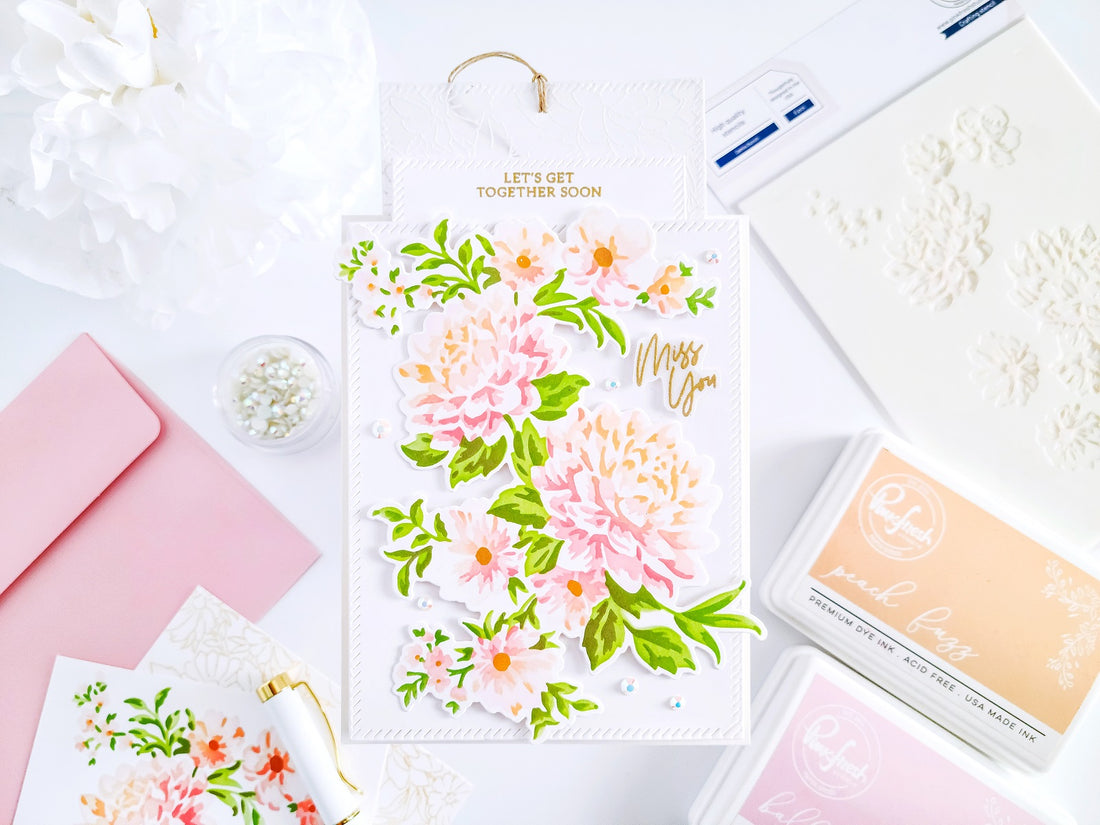
Dahlia Bunch - Interactive Card┃Yasmin Diaz
Happy Monday, Pinkfresh friends! Yasmin here sharing with you a fun double-slide, yet still elegant & delicate with lots of dimension “Floral” inspiration card. Therefore, to make this fun interactive card I used Dahlia Bunch Layering Stencils, Dahlia Bunch Die and Dahlia Bunch Stamp Set to create the floral cluster. A combination of Essentials: Diagonal Stitched Rectangles Die Set and Essentials: Diagonal Stitched Squares Die Set to create the detailed frames. Essentials: Shaker Tags to create the double-slide mechanism + PFS- Inks to add the pops of colors to the floral cluster, and last but not least, Jewels: Glacier to add a pop of shine to the card. So, without further ado let’s jump right into the step-by-step for how I made it.

Therefore, I started off by placing down a white card panel over my stencil mat, and then I went ahead to line up the guide lines from stencil #1 including in Dahlia Bunch Layering Stencil set. Once, the card panel and stencil were line up, I went ahead to ink up the layer using an ink blending brush along with Ballet Slipper Ink. Next, I went ahead to continue the layered stenciling using stencil #2 along with Coral Reef Ink to ink up the bottom part of the flowers and Peach Fuzz Ink to ink up the top part of them. Then, stencil #3 along with Passion Fruit Ink and Apricot Ink to add depth to the third layer. Stencil #4 along with Clementine Ink with a touch of Espresso Ink to create a terracotta hue for the center of the flowers.

Once, I’ve got the flowers inked up, I went ahead to ink up the leaves using, stencil #4 along with Grassy Knoll Ink, stencil #5 along with Olive Ink and once again a touch of Espresso Ink to add a brown-greenish hue to the leaves. Thus, after finishing the ink up layering for the floral cluster, I went ahead to line up over it its coordinating die which happens to be Dahlia Bunch Die. So, once I’ve got them line up, I went ahead to run them through my die cut machine to die cut the floral cluster out of the card panel, and once I had that step completed, I went ahead to put it off to the side, so I could start the assembling for the slide mechanism for the card.

Thus, to create the slide mechanism, I went ahead to first die cut the detailed frames, so to do that, I used the smaller diagonal stitched die including in Essentials: Diagonal Stitched Squares Die Set and the largest die including in Essentials: Diagonal Stitched Rectangles Die Set to die-cut both detailed frames out of plain white cardstock. Next, I went ahead to create a subtle floral background over a large piece of translucent vellum using the floral cluster stamp, embossing ink and white embossing powder for a delicate white heat embossing over the vellum. And, as soon as I’ve got finished the heat embossing, I used the smaller diagonal rectangle die including in the set to die cut the detailed frame out of the translucent background.

So, after having all die-cutting pieces complete, I put them off aside and then, I went ahead to trim off the edges of an A2 white card panel to H 5-1/4” x W 4.0” inches using my paper trimmer. Then, I went ahead to line up in the center of it in a vertical way the gift card notch die including in Essentials: Shaker Tags set. And, once I’ve got them line up, I went ahead to run them through my die cut machine. Although, this die only die cut the notches it adds up the marking lines with the pressure of the die cut machine, which by the way are perfect to create the openings in both sides of it by using a ruler and Xacto knife making it an easy way to create the slide mechanism, instead of creating a bunch of measuring steps for it.
NOTE: I left a 1/4” of an inch margin on the top and bottom before I got to the die-cutting notches.

Having that said, to start the assembling for the slide mechanism, I went ahead to trim down a piece of heavy weight cardstock to W 3.0” x H 3/4” inches. Next, I’ve got inserted the small piece of white cardstock between the openings. Then, I’ve got it slide it to the top and once I had that done, I added pieces of craft foam adhesive on both sides to raise some dimension to it. While I was holding it in that position, I went ahead to peeled off the backing of the craft foam adhesive, and then I’ve got the backing of the small die-cutting square adhere to it but making sure it was adhered right in the center of the slide mechanism.

Moving on, as soon as I had that step done, I’ve gone ahead to get the first card sentiment stamped and heat embossing over the top side of the square frame. Next, after adding the card sentiment, I went ahead to slide down the detailed square, and then I went ahead to place the card assembling panel facing down, so I could get the second frame adhered to it. Thus, to do that, I went ahead to adhere a piece of craft foam adhesive in the center of the slide mechanism, and then I’ve got the backing of it peel off to get the translucent frame adhere to it with the pretty side facing down as well. But, making sure that I’ve got it adhered edge to edge to the white frame. Therefore, after getting it adhered to the slide mechanism, I went ahead to flip it over and confirm that it slides perfectly without problems.
NOTE: Even though, you are not able to see it nor was necessary to add, I also added a half circle notch to the center of the slide mechanism panel. A notch which I created with a circle punch, so I’m mentioning this just in case, you want to add a smaller front panel so the recipient is able to see i that extra detail.

Lastly, after confirming that the slide mechanism worked perfectly, I went ahead to add narrow pieces of craft foam adhesive to the back edges of the assembled panel to raise dimension for the slide mechanism, and then I’ve got it adhered to an A2 top folding white card base. Next, I added narrow pieces of craft foam adhesive once again to the front of the assembled panel to raise even more dimension to the front side of the slide mechanism. Once, I had that step complete, I’ve got peel off the film from the craft foam adhesive, so I could get the detailed front card panel adhered to the card. A detailed card panel which I’ve had previously die cut earlier. Last but not least, I’ve got mounted the floral cluster over the card along with a card sentiment. A sentiment, which I’ve got previously stamp, gold heat embossing and fussy cut out of a piece of translucent vellum using, another sentiment stamp from the same stamp set.

Finally, to finish the card off, I went ahead to slide up the detailed frames and to make it easy, I decided to open a small hole using a hole puncher and then I added a string of natural hemp for a organic look. Then, as a finishing touch, I’ve got glue down here and there some Jewels: Glacier to add a touch of shine to the card. With that being said, thank you for stopping by we hope you have enjoyed reading the step-by-step for how I’ve made this fun double-slide, yet still elegant & delicate with lots of dimension “Floral” inspiration card using an array of beautiful products by Pinkfresh Studio.
If you get inspired by today’s projects don’t forget to tag us @pinkfreshstudio and use #pinkfreshstudio so we can see your projects! Happy crafting and much love to you and yours.
Crafty Hugs,
- Yasmin