Clean and simple Wildflower bouquets
Hi Pinkfresh friends!
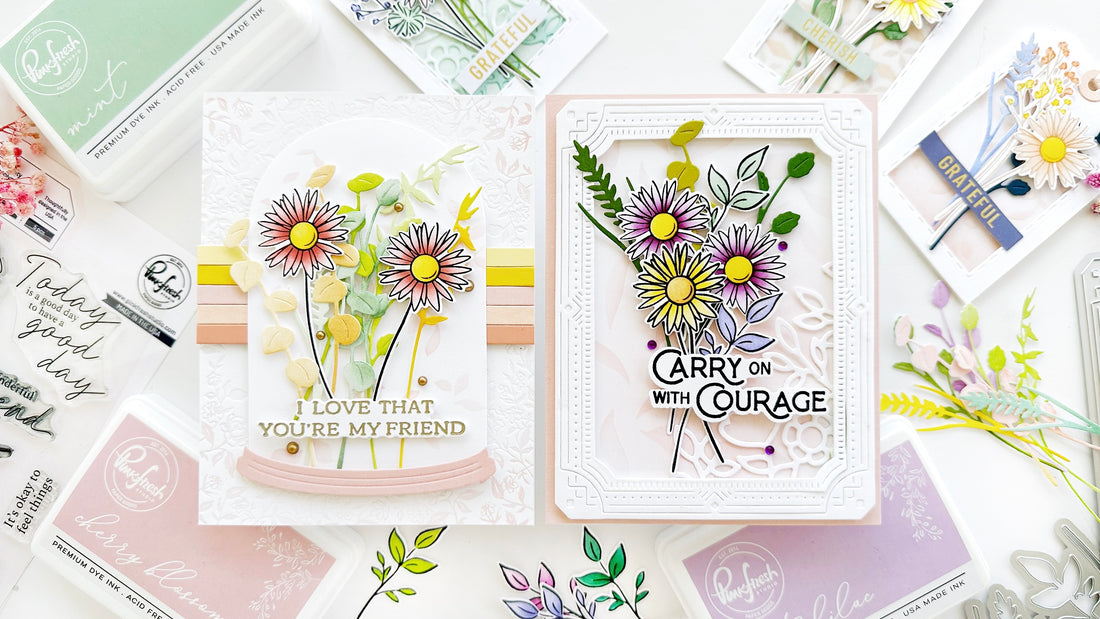
I've been wanting to use the new Wildflower Bouquet Stamp and finally got a chance to create this fun set of cards. Each of these cards are really easy to make. I I always love to play with color combos, so for today, I decided to use a peachy palette for one card and a green and purple combo for the other one:

I started out stamping this set with Misty Coast ink so I could stamp it again in Detail Black in once it was colored. I colored away a bunch of these flowers and branches with the coordinating stencils and created small arrangements so I could make several projects.
For my first project, I used Soft Lilac, Candy Violet, Sunshine, Sweet Mustard and Marigold for the daisies amd Mint, and Wisteria for the greenery. I also cut out some additional branches out of green cardsstock.

I wanted to add some texture to the background so this time, instead of using a coverplate die, I thought I'd grab one of the stencils from the Leafy Background Stencil set to add color to my background with Cherry Blossom.
I added a white frame using the Art Deco Frame die set onto this colored background but then I decided to add some more texture with the Secret Garden die. I removed my frame very carefully from one of the corners and tucked a portion of this Secret Garden diecut.

For my sentiment I stamped in Detail Balck ink one of my favorite sentiment sets: Wonderful Sentiments Stamp. I always add some antistatic powder before stamping with my Detail Black ink and clear heat emboss it afterwards so I get a glossy sentiment. I also added some Purple Clear drops.

For my second project I went with these lovely sunflowers colored with Cherry Blossom and Coral Reef . Using the Wildflower Bouquet Coordinating stencils I also added some color to the greenery using Apricot, Mariglod, Grassy knoll, Fresh Pear, Sweet Mustard and Eucaliptus.
Using the Terranium die I also created a subtle textured background with the Delicate Foliage Coordinating stencils. This is also a fun way to stretch your stencils and I love stencils so why not use them to add dimension and texture?

Next up, I I foam mounted the flowers and greenery onto the Terranium die and added some Matt Gold Metallic Pearls. For my sentiment I used one of the My Favorite Things Sentiments Press Plates with gold metallic pigment ink.
I really really love subtle backgrounds with a little bit of extra texture so the fabulous Fairytale Frame Press Plate is the perfect plate to just add that extra texture. Instead of inking up this whole plate, I just added some Cherry Blossom ink onto the corners with a blending brush.

Before adhering the Terranium piece onto the Fairytale Frame I added some colorful strips to add some additional color and texture to the design.
Since I had so many leftovers Wildflowers, I created some tags. I find tags so quick and easy to make... I just love them. Besides, it's always good to have them ready to add to your handmade gifts:

I finished these tags with the Best Wishes Cardstock stickers.
I hope you enjoyed learning more about today’s projects and are excited to create something too with these ideas! Thank you for stopping by!
Raquel
3 Comments
I am addicted to Pink Fresh products! I want them all.
These cards and tags are sooo pretty. I really like you arranged the elements and your colour choice.
Love all the colors of your cards! They are all beautiful.