
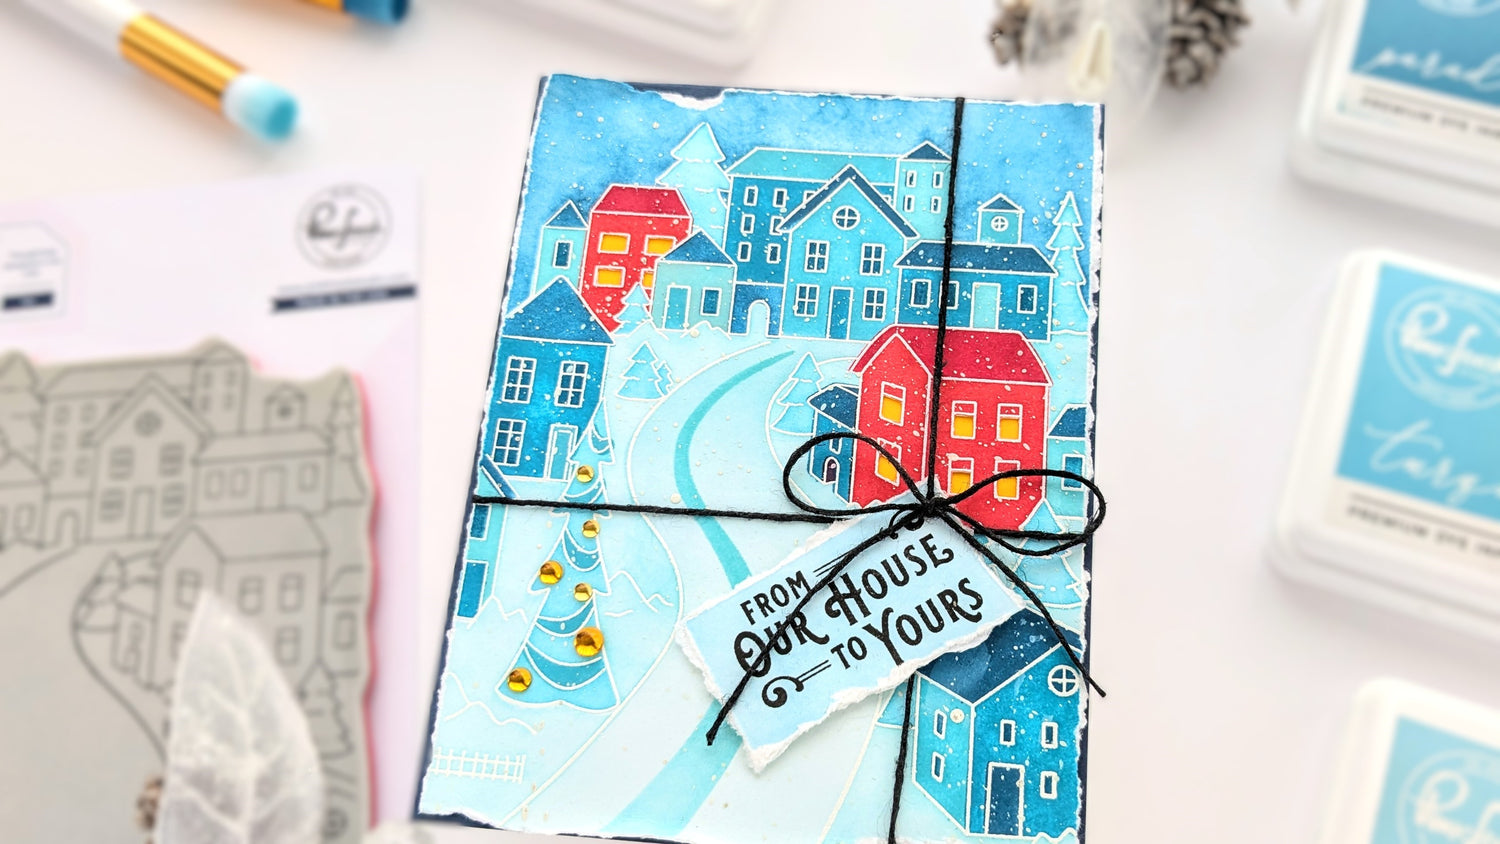
Hi everyone! I'm on the blog today with a wintery holiday village scene. I used all the ink colors in Pinkfresh's Amalfi Coast collection for a bluey (real word!) Holiday Street scene. Just a couple of added details lend it a "hand-painted" appearance. Add in a sentiment from the new Holiday Greetings Sentiments stamp set, and I ended up really loving this card. Seeing this design inked up with the Napa Valley colors or the Weeping Willow collection might be really cool too! Now, I'm getting off-topic. Let's get started with this one first.
I started by white heat embossing the village on a half sheet of white cardstock, 8 1/2 in. X 5 1/2 in. When I tear away the border of the card later, it helps to have a good-sized strip of paper to pull at.

Then, I pulled out the Holiday Street 7-stencil set and the Amalfi Coast collection of inks. I used Waterfall with stencil #1. With stencil #2, I used Waterfall again, but I made sure to dab off a lot of color from the brush before applying it to keep it lightly colored—it's the snowy ground. With stencil #3, the trees, I used Turquoise lightly. For stencil #4, I used Turquoise more heavily. Stencil #5 I used Paradise (one of my new favorite colors!). For stencil #6, I used Atlantis, fairly heavy, and with stencil #7, it was Atlantis again; I made sure to dab off a lot of ink from the brush before inking in the sky in sort of light, circular motions to get that mottled, stormy winter sky appearance.
I made sure to mask off two of the houses when coloring with my blue inks and used Berrylicious and Candy Apple to color them. I used my craft knife to cut out the windows of the red houses and taped yellow/orange paper behind them. I like that bit of dimensionality it lends.

I watched Heather and Lea Live recently (on the Pinkfresh Studio YouTube channel) when they were sneak-peeking the holiday collection. Heather had a great tip: Color the windows, then use glossy accents over them and let them dry. And the clear glossy accents will resist the rest of your coloring!
When everything was colored, I splattered it with white gouache for snow. When it was fully dry, I pulled out a metal ruler and held the edge of it where I wanted the border of the card to be. Then, I tore that strip of paper off, pulling it up against the ruler for a straight-line torn look. I roughed the border up a bit more to let more of the dark blue cardbase show.

I used Waterfall to color a scrap of cardstock and stamped that just-right sentiment from the new Holiday Greetings Sentiments in Detail Black. I punched a hole in one corner and threaded through some black string and tied a bow. Then, I put strong double-sided adhesive in the center of the back of the colored panel so that when I stuck it down to the cardbase, the edges and corners would bend up a little. I think it added to the painted look of my card.
Then I added amber-colored clear drops to the tree and was done!
I hope that some of these design choices have inspired you to make something new today! Thanks so much for coming by!
-Anne

6 comments
Coonrod Cecile
Leave a comment
All comments are moderated before being published.
This site is protected by hCaptcha and the hCaptcha Privacy Policy and Terms of Service apply.